The idea for this article series arose from a situation with a client where we introduced CI/CD because the manual workload was no longer manageable. The following instructions are therefore fresh from practice. For simplicity, we have shortened the long process of trial and error and present only the final result here. The code snippets are exemplary but sufficient to demonstrate the functionality.
Part 1: Go, Docker and Self-hosted Build Agents
What is Azure DevOps?
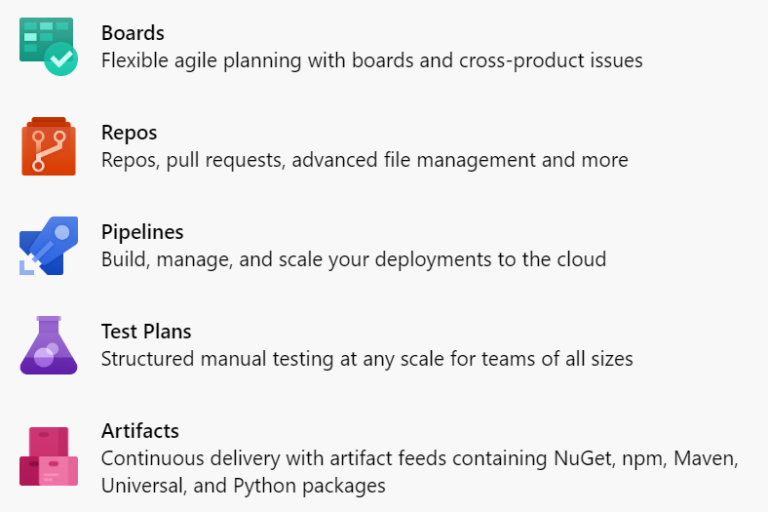
Azure DevOps is a web platform from Microsoft that provides tools for various areas in the IT project environment:
Azure Boards for project management
Azure Pipelines for CI/CD
Azure Repos for source code management
Azure Test Plans for manual testing
Azure Artifacts for artifact management
The tools interact with each other, for example, work items from Azure Boards can be linked to pull requests in Azure Repos. Before a pull request is allowed to be merged, a pipeline in Azure Pipelines must confirm the correctness of the code and finally upload an artifact to Azure Artifacts. In this article series, we will only make use of Azure Repos and Azure Pipelines.
The First CI Pipeline – Go and Docker
Our first use case is a microservice in Go, which should be installed using Docker. We will create a CI pipeline that should do the following:
Build and test the Go microservice
Build a Docker image
Upload the Docker image to a Docker registry
Azure DevOps offers two ways to create pipelines: via a graphical interface or via YAML files that are checked in with the Git repo. Usually, this file is committed to the root directory of the Git repo under the name azure-pipelines.yaml (but the name is freely selectable). Since we want to develop our pipelines in a team, document them, track changes, and reuse sections, we decide on the advanced variant with the YAML files.
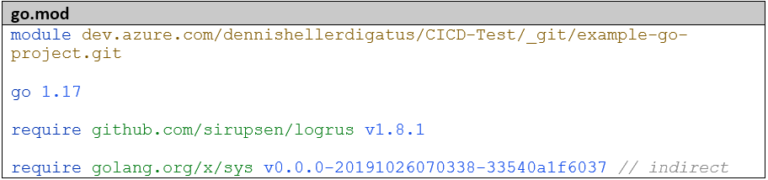
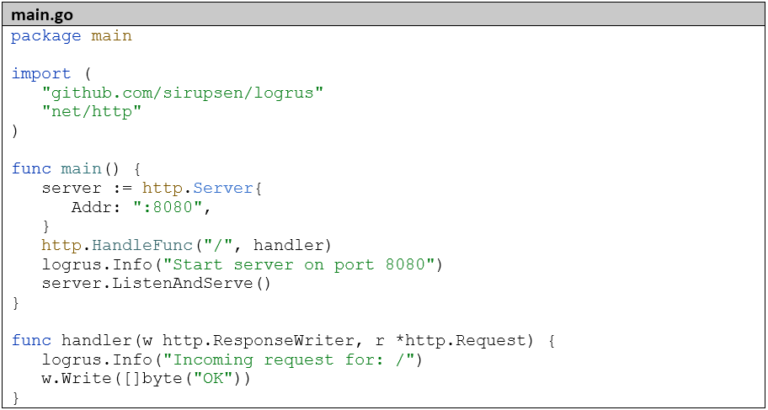
The microservice is very simply structured: it just starts an HTTP server with a REST endpoint:
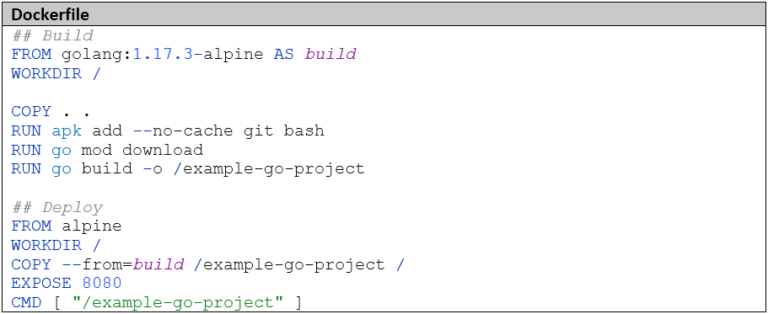
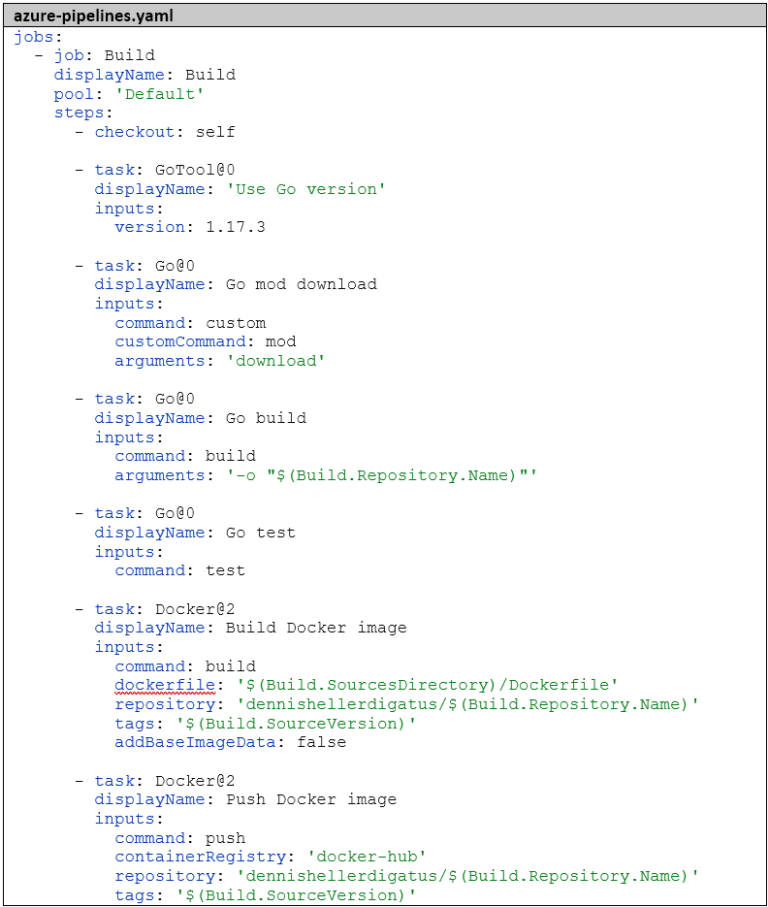
Now for the exciting part: the CI pipeline. In Azure DevOps, the executable part of a pipeline consists of Stages, a Stage consists of Jobs, and a Job consists of Steps. For our simple case, one Stage with one Job is completely sufficient. The functionality of a Step is described using a Task, for example, there is a Go Task, a Docker Task, and a Git Checkout Task. With the Bash or PowerShell Task, there is the possibility to execute custom scripts. For more complex use cases, there is also the option to develop custom tasks in TypeScript. Since the build process is already completely defined in the Dockerfile, we only need docker build and docker push as build steps. We use the Docker Task for this.
In addition to the actual build process, we can define in the pipeline
which events should automatically trigger the pipeline.
which variables and variable groups should be used.
whether the pipeline should be parameterized.
whether additional Git repositories should be checked out.
All these settings can also be omitted, then the pipeline is automatically triggered for every Git push, has no variables and parameters, and only the own Git repository is checked out. This is also the behavior we want for our pipeline.
Within the pipeline, we have access to some predefined variables that give us information about the name, organization, and checked-out commit of the Git repo, among other things. A list of all predefined variables can be found here. Of course, custom variables can also be defined at runtime to pass data between steps. We use
$(Build.SourcesDirectory), the path on the build agent where the Git repo is checked out as a path prefix for accessing files.
$(Build.Repository.Name), the name of the Git repository as the name for the Docker image.
$(Build.SourceVersion), the commit hash as a tag for the Docker image
The complete pipeline definition therefore looks as follows:
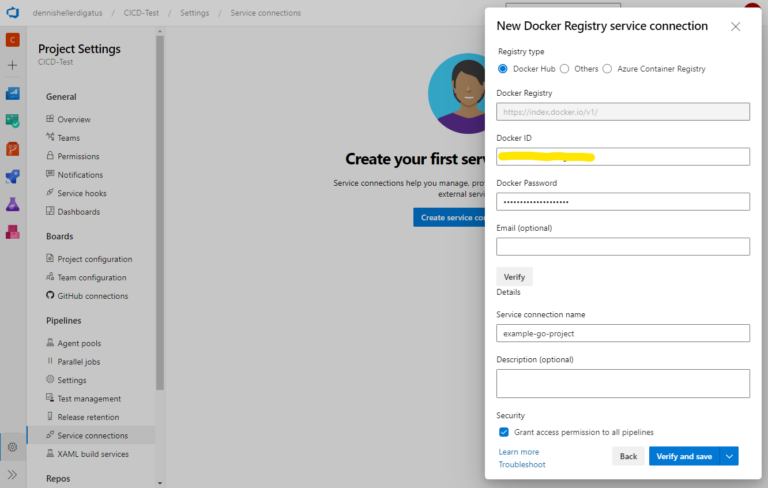
As the target ContainerRegistry, we have specified ‘docker-hub’ here. This is a reference to a so-called Service Connection, which generally describes a connection to an external service in Azure DevOps. This allows the pipeline to use it without having to store any credentials directly in the pipeline. To create a new Service Connection, we go to ‘Project Settings’ and then under ‘Pipelines’ –> ‘Service Connections’. We create a connection to a Docker registry in Docker Hub. A prerequisite for this is a (free) Docker account. Of course, we could also use any other Docker registry.
Next, we need to enter our credentials for the Docker Hub account. Important: an Access Token must be created in Docker Hub beforehand as the password.
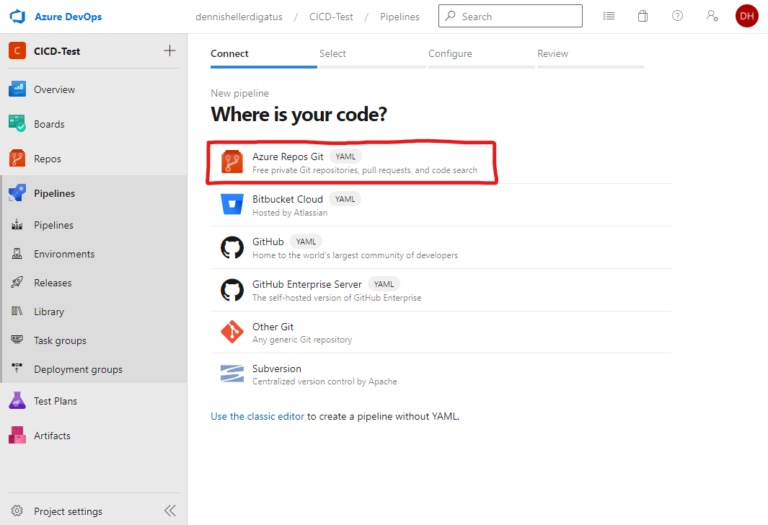
After we have committed all files, we only need to create the pipeline in the Azure DevOps interface and reference our azure-pipelines.yaml. To do this, we click on ‘Create Pipeline’ under ‘Pipelines’:
Our azure-pipelines.yaml is located in Azure Repos:
After selecting the correct Git repo (in our case ‘example-go-project’), Azure DevOps automatically recognizes our azure-pipelines.yaml because it’s the only YAML file.
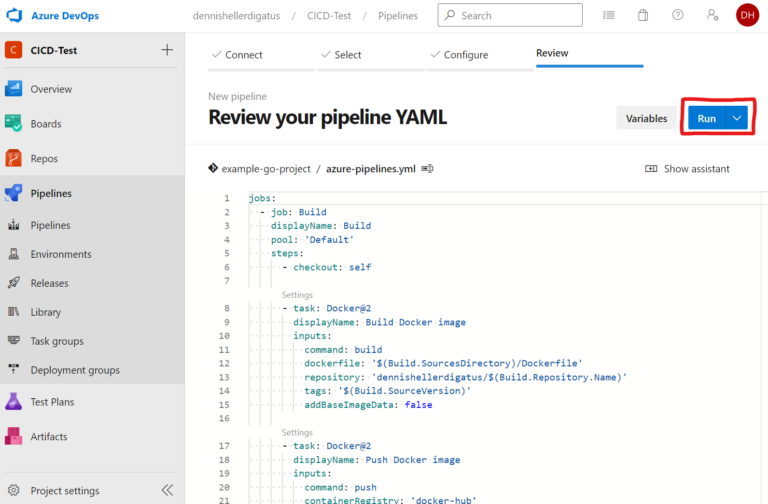
A well-considered click on ‘Run’ and we can finally see the fruits of our labor:
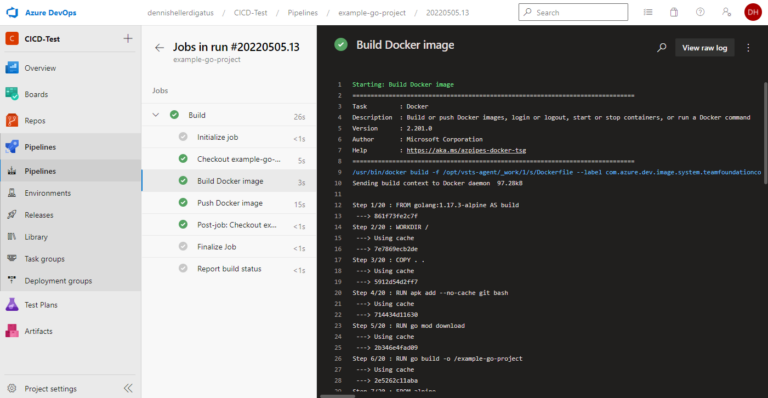
As we can see, the Docker image was built and automatically uploaded to Docker Hub:
A quick test in a local shell confirms that everything worked flawlessly and the Docker image can now be used anywhere:
Unit Tests and Code Coverage
Every good pipeline includes automated testing. Therefore, we now expand our Go project with a unit test and add a step to the pipeline that executes the tests. If tests fail, the pipeline should abort and neither build nor push the Docker image.
Our first test initiates an HTTP request to the standalone server and checks the response:
The test runs locally for now:
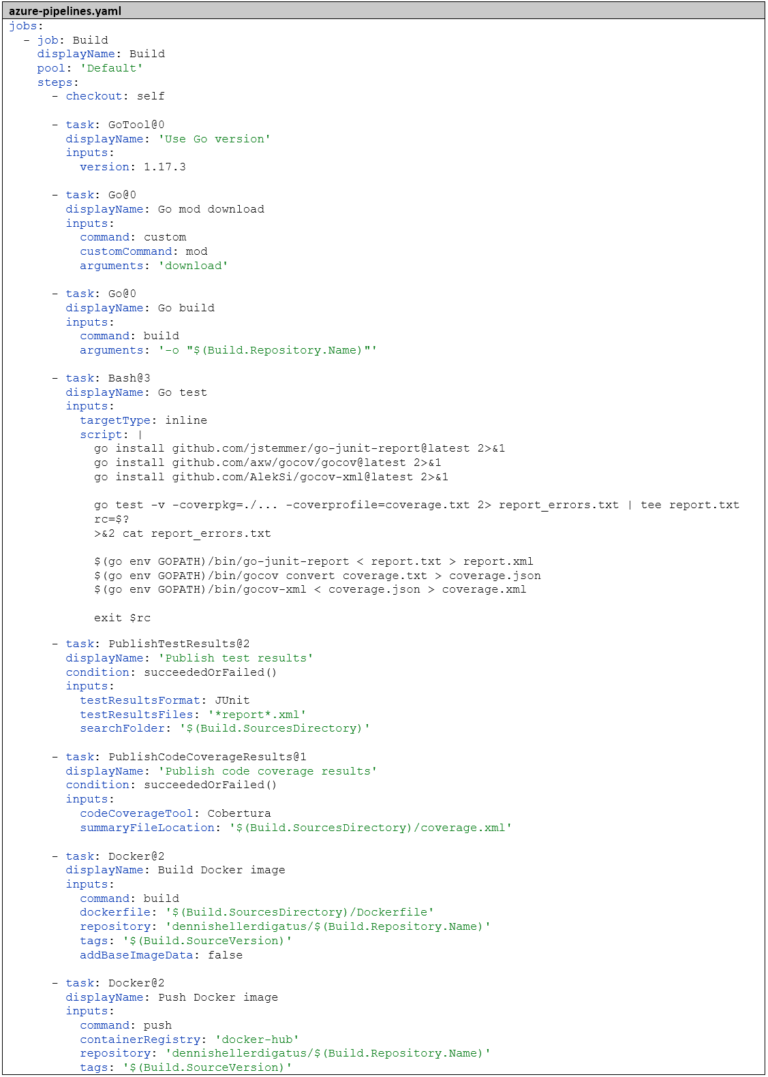
Then we add the tests to the pipeline. Azure DevOps offers two predefined tasks for Go projects: GoTool and Go. With GoTool we select the Go version for the pipeline, with Go we can then execute any Go commands. Before running the tests, we build our Go project. Even if this isn’t strictly necessary, it helps with troubleshooting whether an error occurs during building (syntactic error) or only when executing the tests (semantic error). Two steps are necessary for building: go mod download to download the libraries and go build to compile. The tests are then executed with go test. So we extend the pipeline as follows:
After committing and pushing, the pipeline should start automatically, build the application, and run the test:
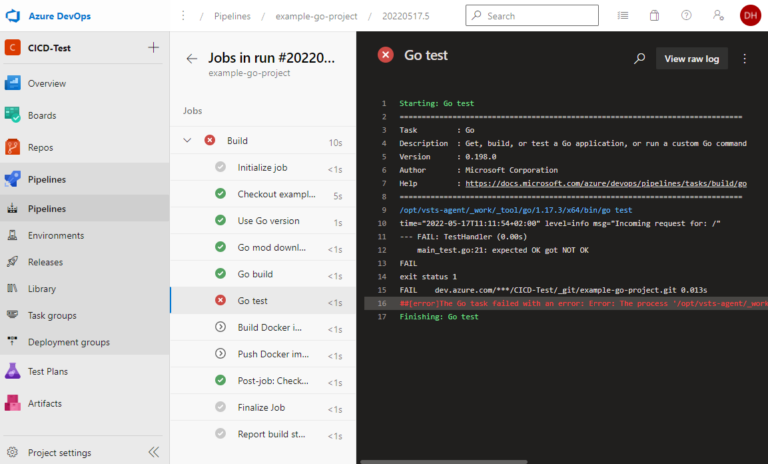
We’re slowly getting a feel for CI and its implementation in Azure DevOps. To make sure that the negative case also works, we now change the code so that the test fails:
As expected, the pipeline fails and aborts before the Docker image is built:
To specifically check which test failed and why, we have to look in the log. With a single test, this isn’t a problem, but if we have hundreds of tests, we don’t have the time to scroll through thousands of lines to find the tests that failed. Also, we don’t immediately see what percentage of tests failed. Fortunately, Azure DevOps offers an interface here for providing test results in JUnit XML format. To be able to use this, however, we need to convert the output of go test into this format.
Fortunately, someone else has already done this work for us and written a corresponding Go tool: https://github.com/jstemmer/go-junit-report. We’re also interested in test coverage. Here too, there’s an interface from Azure DevOps and ready-made tools for conversion into the right format.
For this entire complex process, we create a Bash task that will do the following: First, it downloads the necessary tools, then runs the tests, keeping the return code for later. We want to use the return code of go test as the return code for the entire step so that Azure DevOps knows whether the step failed or not. But before that, we still need to prepare the report and coverage, both in case of success and failure. Then we add the two tasks PublishTestResults and PublishCodeCoverageResults. It’s important to add the condition: succeededOrFailed() here. Normally, subsequent steps are not executed if a step fails (i.e., the default value is condition: succeeded()), but with condition: succeededOrFailed() they are executed even if previous steps failed, unlike condition: always(), but not if the pipeline was manually aborted.
Side note, in case the builds should run on a self-hosted build agent: the PublishCodeCoverageResults task expects a .NET Runtime to be installed on the build agent.
Here is the completed pipeline:
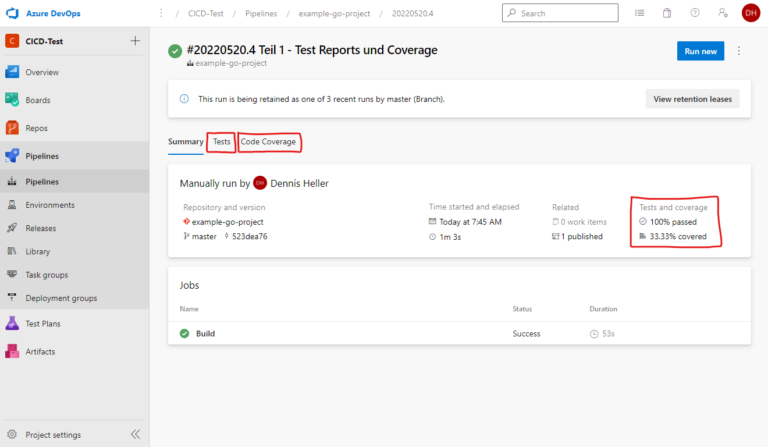
After the successful completion of the build, we now see the test results and coverage graphically prepared in two new tabs:
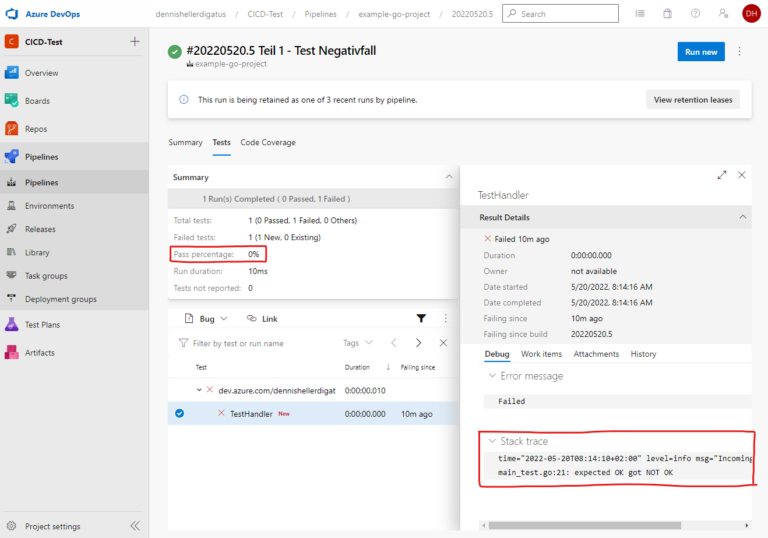
Similarly, in case of a failed test, we see a precise error message:
Conclusion
Azure DevOps offers a good opportunity to create pipelines quickly and comfortably. The graphical interface is simple and easy to understand, and is particularly recommended for beginners in DevOps. For this, creating pipelines through the graphical drop interface is suitable. The connection to external services is also simple and quick. Nevertheless, by switching to YAML syntax for pipelines, it is also suitable for more complex use cases. This allows for the definition of almost arbitrarily complex pipelines. In this article, we have only looked at a fraction of the features of Azure DevOps so far.
In Part 2, we will:
Integrate another Go project including pipeline as a dependency into our first Go project.
Create a pipeline template for reuse in future pipelines.
Incorporate an intelligent versioning algorithm following Semantic Versioning into the pipeline.
Letzte Beiträge
IT Infrastructure
Successful Transition of Thüga Aktiengesellschaft’s IT Landscape and Takeover of IT Support
Press Release
digatus and Gubbi Combine Their Expertise in a Strategic Partnership
IT M&A
digatus Supports Infrareal in the Acquisition of the Pharmaceutical and Biotech Site in Orth