The idea for this article series arose from a situation with a client where we introduced CI/CD because the manual workload was no longer manageable. The following instructions are therefore fresh from practice. For simplicity, we have shortened the long process of trial and error and present only the final result here. The code snippets are exemplary but sufficient to demonstrate the functionality.
Part 2: Go Libraries, Pipeline Templates, and Versioning
After creating a simple pipeline in Part 1 of this article series, we dive deeper into the subject in Part 2. We create a library for our Go example project that will contain shared code with other future Go microservices. We face the challenge of keeping its Git repository private in Azure DevOps. Then we create a new pipeline for a Python application. To avoid duplicate code in the pipeline scripts, we create a pipeline template from which both pipelines inherit their basic structure. We also extend the pipelines with automatic versioning using Git tags, which will significantly simplify dependency management and the use of published Docker images.
Incorporating Custom Go Libraries from Azure Repos
Dependency management in Go is relatively simple: it only requires the URL to a Git repository and a Git tag. Go then checks out the commit with the corresponding tag from the Git repository and makes the code available during compilation. For public Git repositories, such as those on GitHub, not much can go wrong. For private Git repositories, however, a few extra steps are needed.
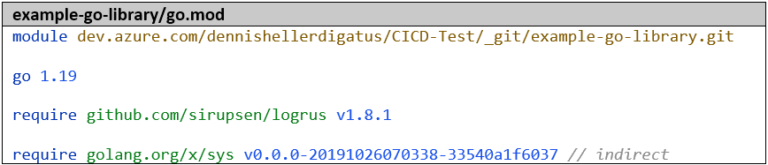
First, we create a second Go project called example-go-library with a function that we want to use later in the example-go-project.
For our library to be referenced later in other Go projects, it is essential to use the full URL as the module name:
Otherwise, we will get error messages of the following type:
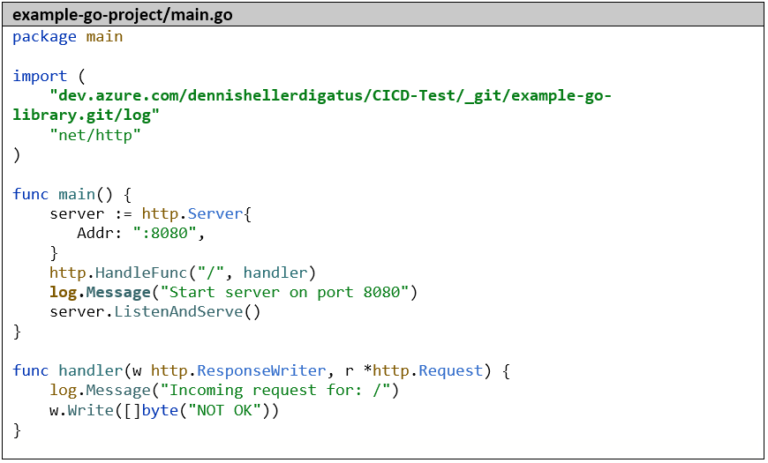
The import in the example-go-project then looks like this:
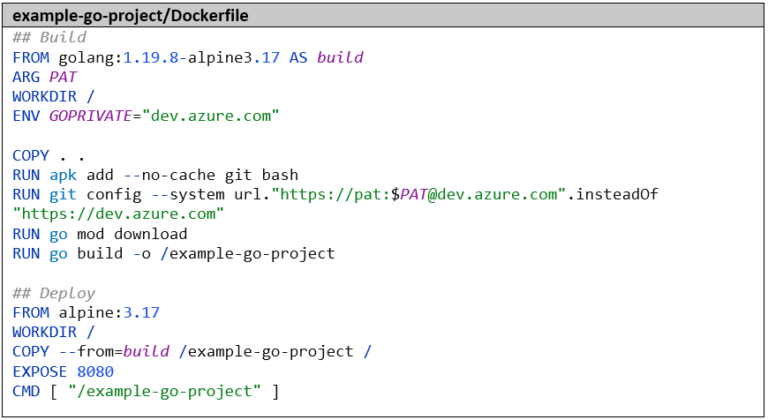
If the library is a private Git repo, as in this case, the following settings are also necessary (both in the local development environment and later in the Dockerfile):
The environment variable GOPRIVATE. It prevents the library from being loaded via a public Go proxy (which has no access to the private Git repository).
The following Git setting for authentication (a PAT can be created in Azure DevOps under the menu item “Personal Access Tokens” in the user menu in the top right corner):
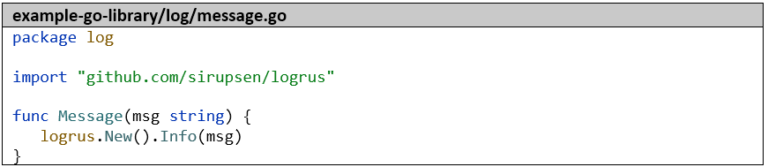
We take the small HTTP server from Part 1 of this article series as a basis and replace the import “github.com/sirupsen/logrus” with “dev.azure.com/dennishellerdigatus/CICD-Test/_git/example-go-library.git/log” and all calls to logrus.Info with log.Message.
The Dockerfile must also be adjusted accordingly so that we have access to the private Git repository there. So we also set the environment variable GOPRIVATE and the Git setting with the PAT here:
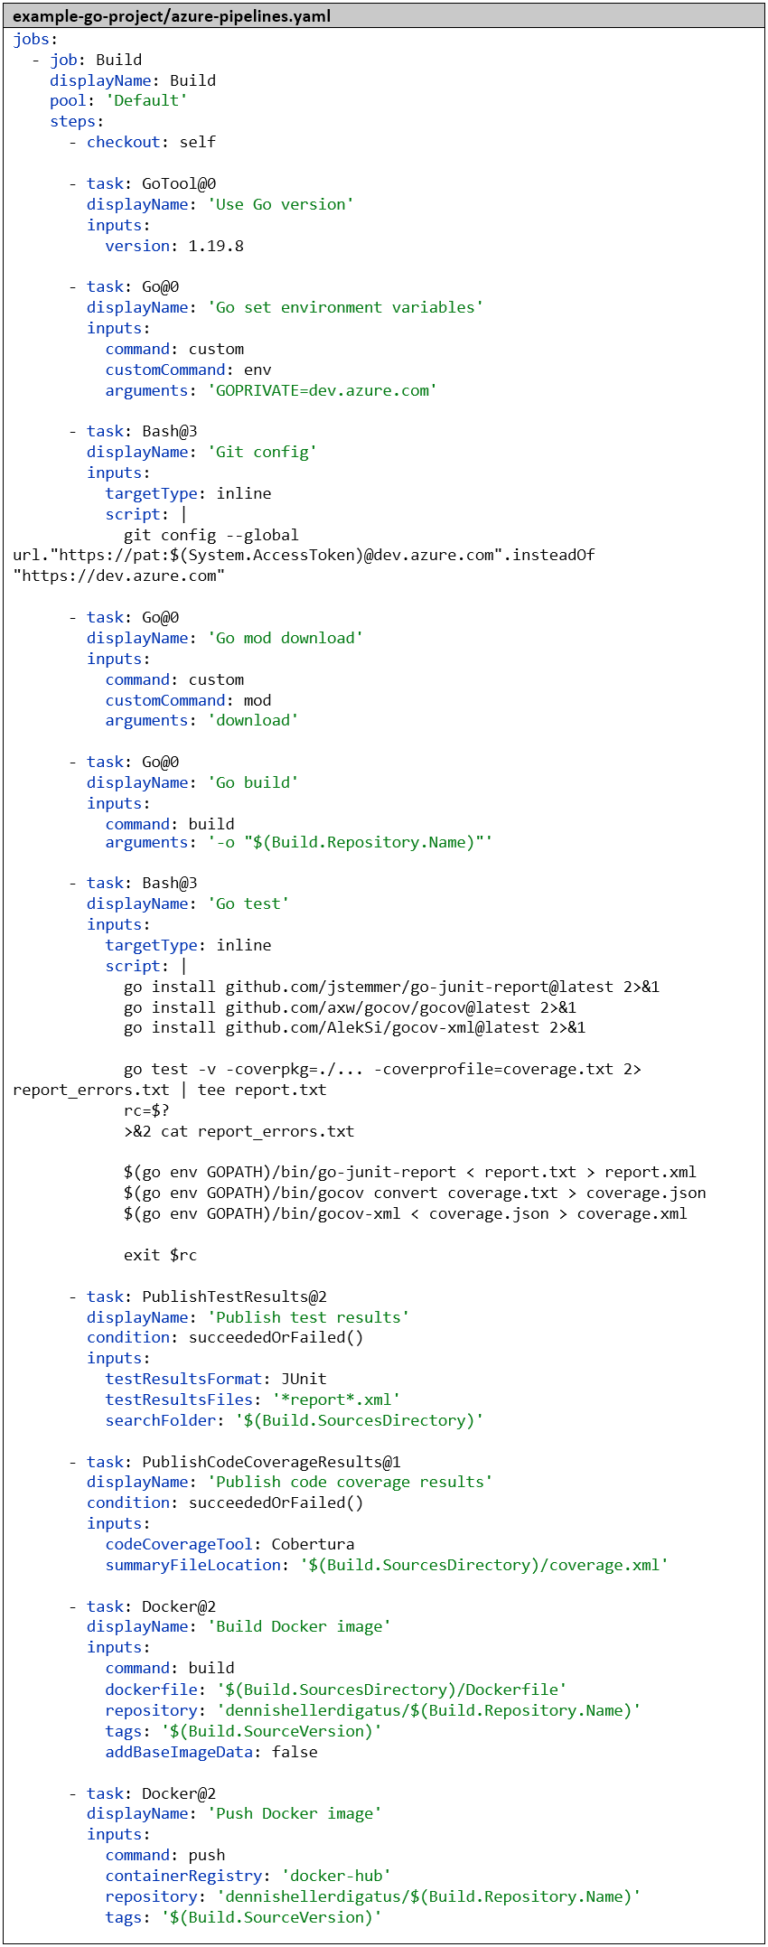
We also need to adjust the pipeline. Here too, we make the necessary preparations before the go mod download step. Fortunately, we don’t have to publish our personal PAT in the Dockerfile, but instead get an automatically generated PAT, as the build is already executed within the protected framework of our Azure DevOps project. We get this via the variable $(System.AccessToken) and it is only valid for the duration of the build. The complete pipeline now looks like this:
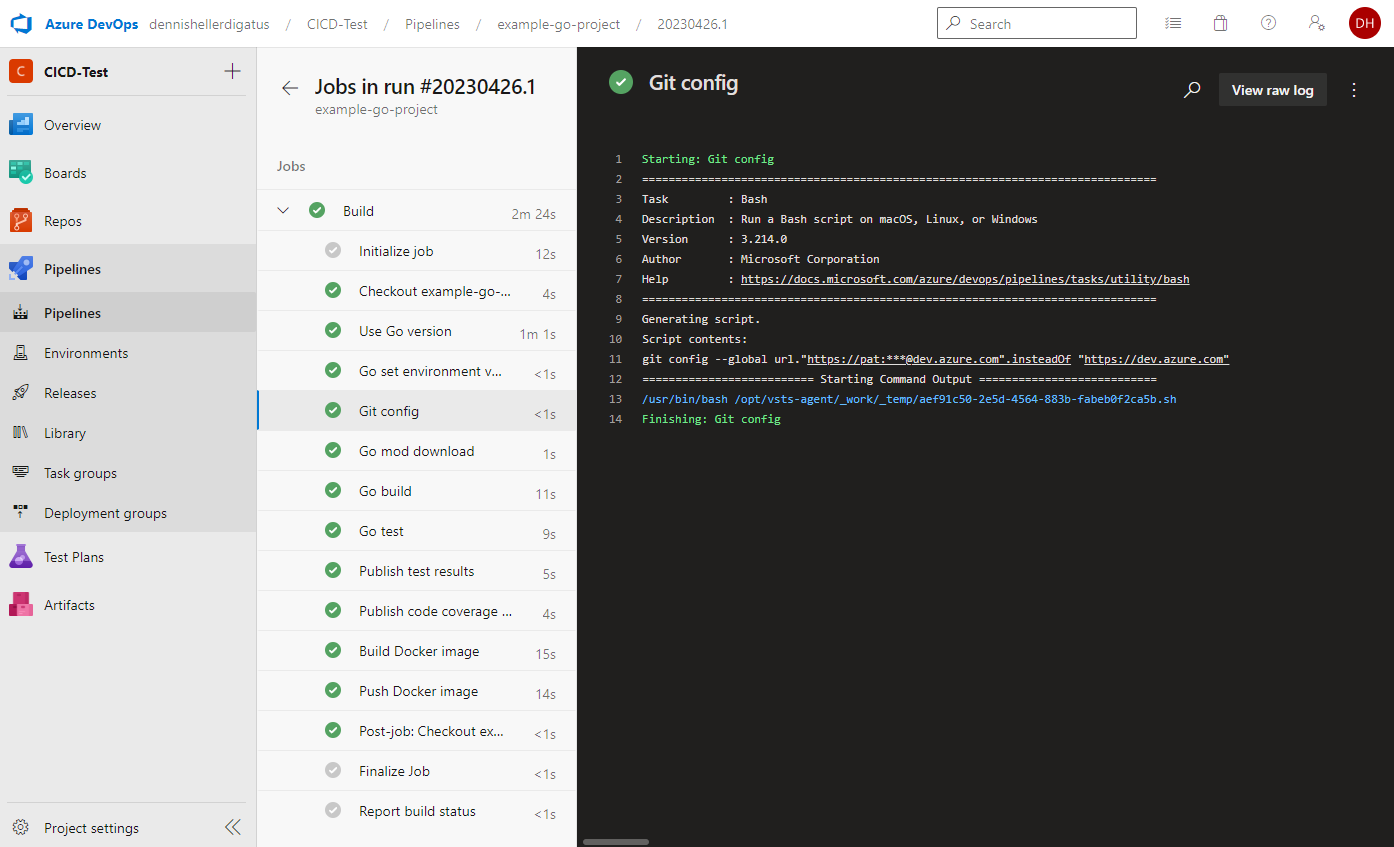
When executing the pipeline, we see that the PAT is used and masked by Azure DevOps:
A test in a local shell then confirms that everything still works as before:
Even though everything looks the same from the outside, we now have the advantage that we can move any code into the library and reuse it in other Go projects. Especially in a microservice landscape with many small services written in Go, there is usually a common code base, so introducing a library can save a lot of duplicate code.
The Second CI Pipeline – Python and Docker
To bring some variety to our microservice landscape, we are now changing the language and creating another microservice in Python. This one is intended to call the REST endpoint of our Go microservice. Of course, the new microservice also gets a pipeline. Since Python, unlike Go, is interpreted at runtime, the build step is omitted here. The test steps look similar to those in the Go pipeline, and the Docker steps are identical. Later, we will extract the commonalities of both pipelines into a pipeline template to avoid duplicate code here as well and to be flexible for future additional pipelines.
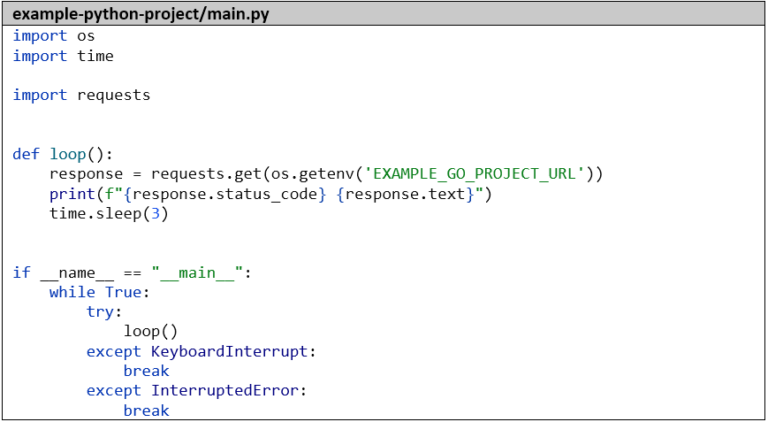
Here’s the simple code of our Python application that simply calls our Go microservice every 3 seconds and logs the result:
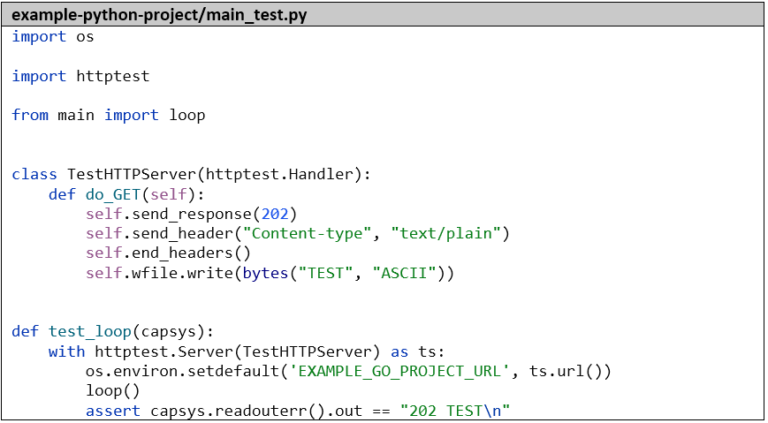
For the sake of completeness, we’ll create a small unit test that mocks the Go microservice and captures the standard output with capsys:
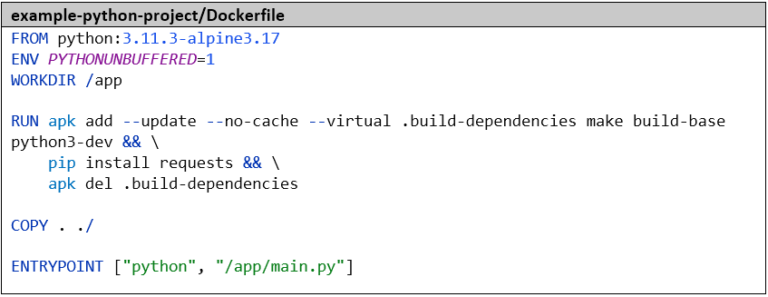
We then package the application into a Docker image. The environment variable PYTHONUNBUFFERED=1 is important to ensure that we can see the log outputs in real-time. We install the dependencies – in this case only one library, otherwise we would use a requirements file – with pip.
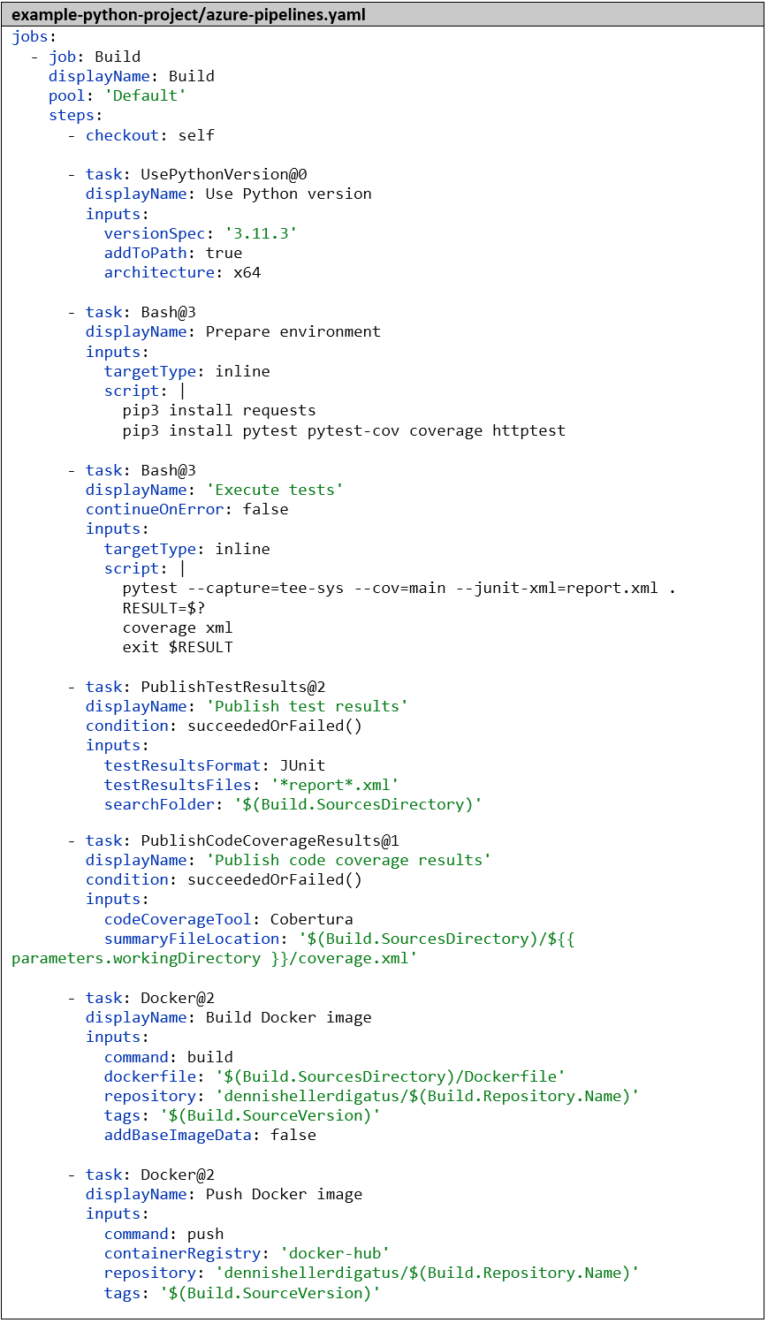
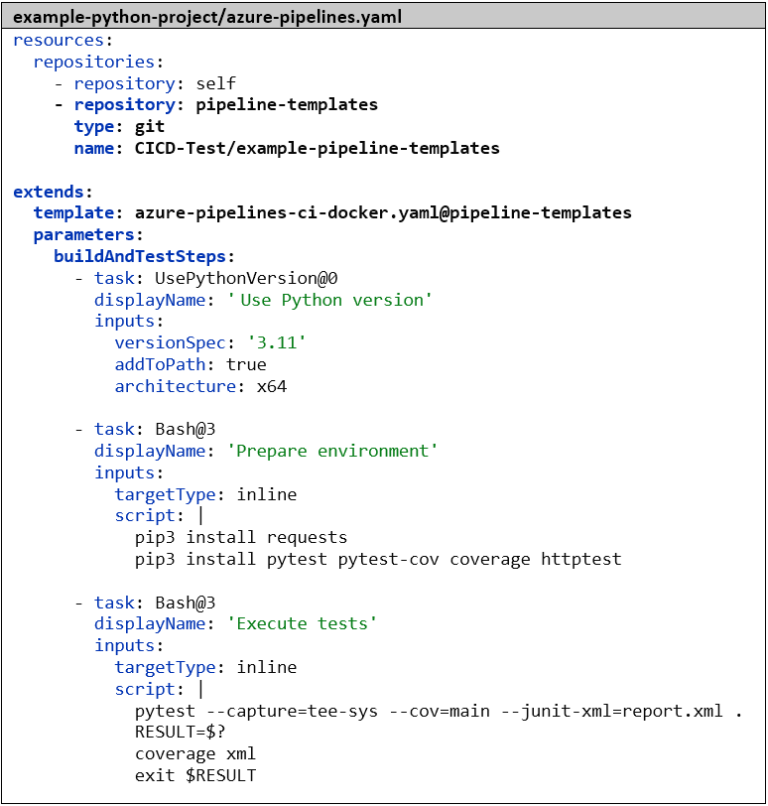
We create the pipeline analogous to the Go pipeline. As the first step, we again tell Azure DevOps which language and version we want to work with – in this case, Python 3.11.3. Next, we install the dependencies and then run the tests with pytest. The parameter –capture=tee-sys ensures that we can capture the standard output in the test. Using –cov=main, we calculate the code coverage, and with –junit-xml=report.xml, we generate the classic test report. Here too, there’s already a tool for processing the code coverage: the Python package coverage. Without further parameters, it’s compatible with the result format of pytest by default. The remaining steps for publishing the test results and for building and pushing the Docker image are identical to the Go pipeline:
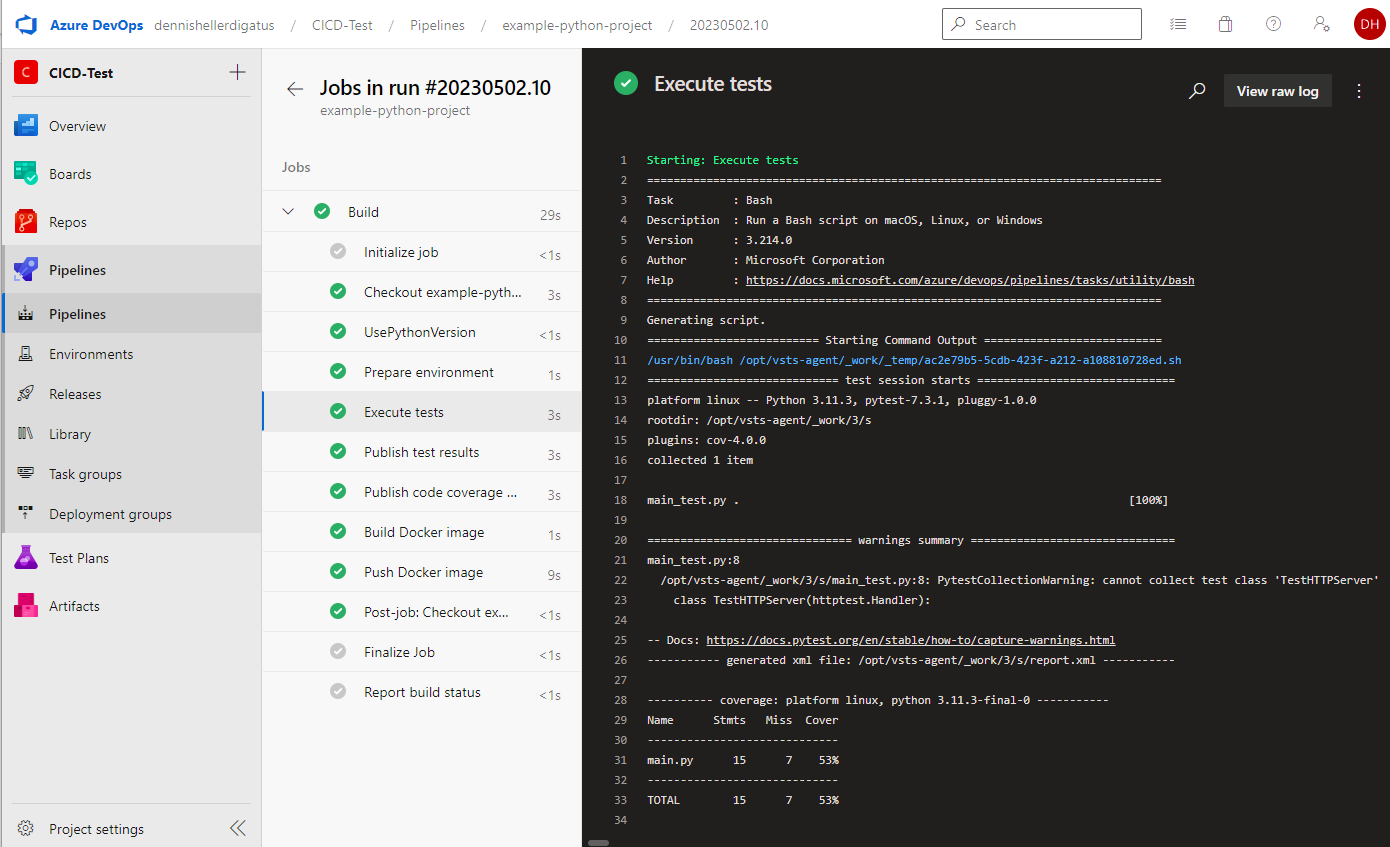
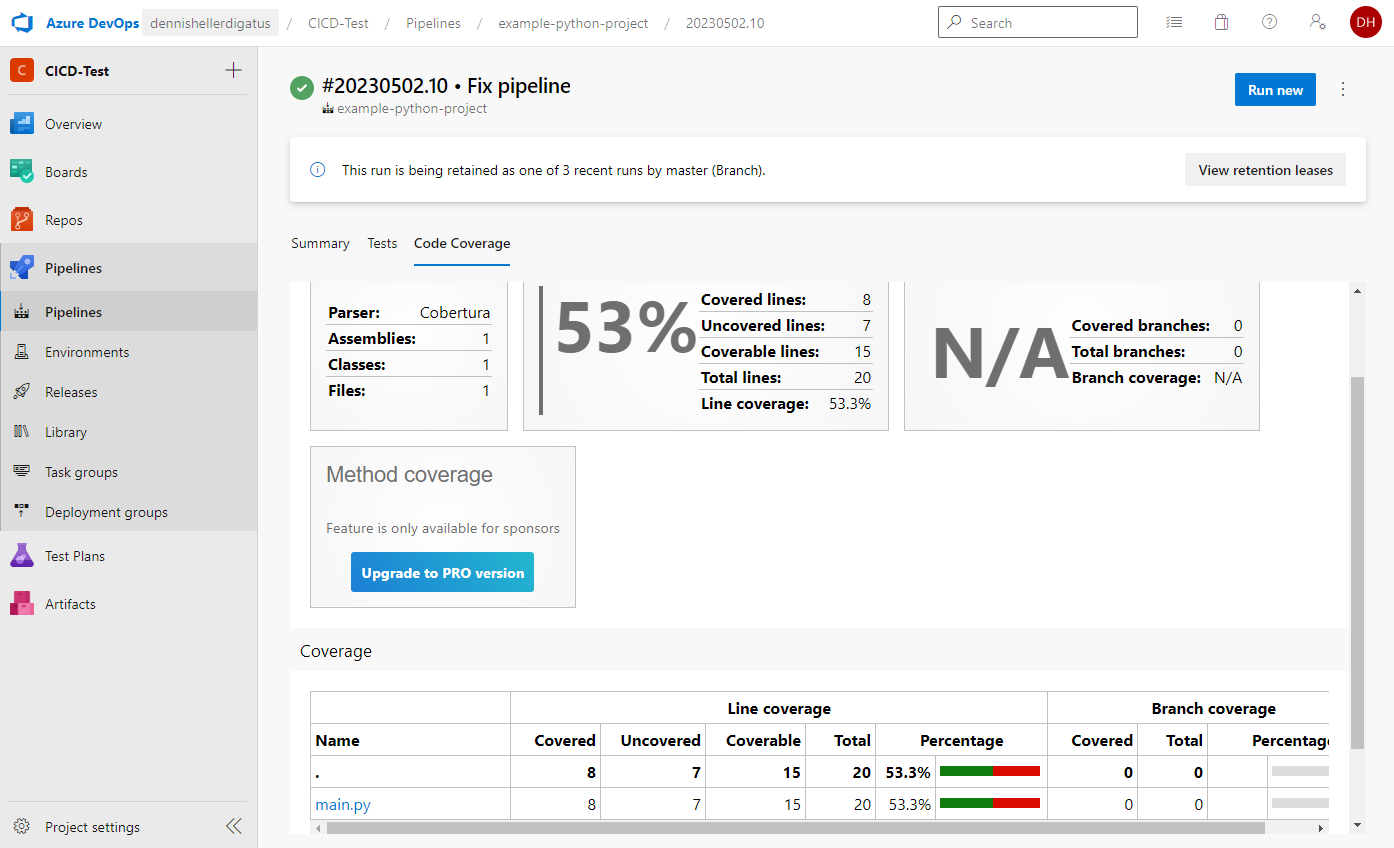
Our first Python pipeline is ready. The result is impressive:
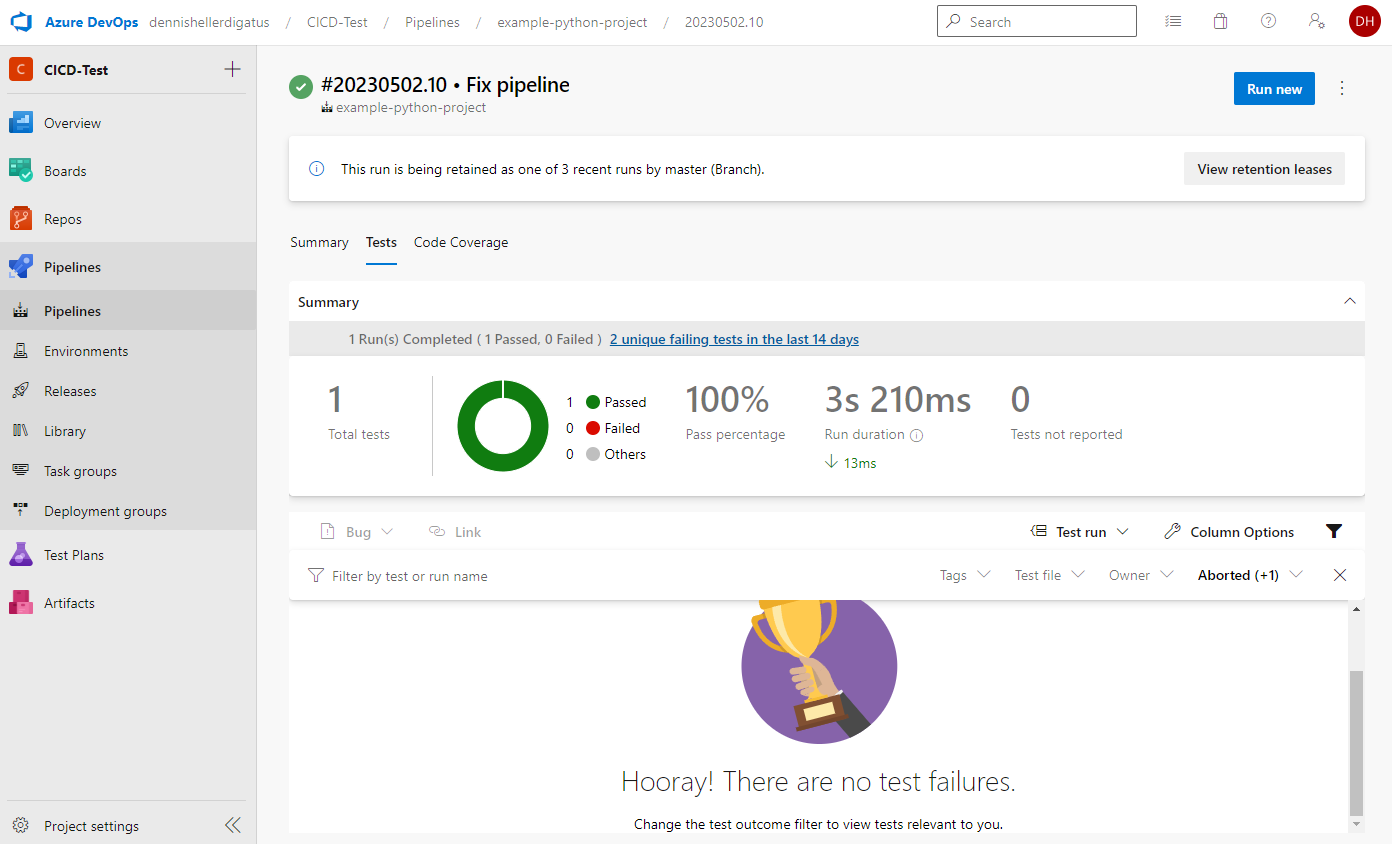
As well as the test results and coverage:
Thinking Ahead: Pipeline Templates
When we now compare our two pipelines – Go and Python – we notice that we have some identical and some different steps. To save work on future pipelines, Azure DevOps offers us the possibility to create pipeline templates. Also, if we want to change or extend a common part of the pipeline later, we only have to do this once in the common template and not in every single pipeline.
The template hierarchy could even be continued further, so that we would have, for example, a common template for the entire company, then a sub-template for the project, and further sub-templates for CI and CD, different languages and frameworks, up to the final pipeline for a microservice. The keyword for using templates is, as in object-oriented programming, extends:. It’s important to note: a pipeline can only inherit from exactly one template. The key to making templates extensible are parameters, which can be used to fill in the placeholders in the template. These parameters can be simple text values, numbers, lists, complex objects, and even lists of complete pipeline steps. Default values are also possible. The parameters of a template are declared at the very top of the template under the section parameters: and can then be used in the code of the template with the following notation: {{ parameters.xxx }}. The template hierarchy and the parameters are evaluated when compiling the pipeline to create a single large pipeline script in which the parameters are already replaced. In contrast to the parameters, there are so-called variables that can be created, modified, and read at runtime. These are used with the following notation and are only interpreted at runtime: $(variable). Template files are stored as YAML files, just like normal pipelines. Since they are used in several other Git repositories, it makes sense to create a separate Git repository for them, in our case we call it example-pipeline-templates.
Back to our two pipelines: the basic structure (publishing the test results and building and uploading the Docker image) is identical. Only the middle part, building and testing, differs. Here’s an overview of all steps in both pipelines:
It is therefore advisable to move the checkout step and the last 4 steps into a common template and insert a placeholder with a parameter for the middle part. This looks as follows:
If a parameter is noted as a single YAML list entry but contains a list, Azure DevOps automatically expands this without us having to write an extra each loop here. The template essentially looks like a normal pipeline and could also be used as such. If we were to create a pipeline in Azure DevOps with this template file, we would have to fill in the parameters manually when starting the pipeline, which is not possible for the stepList type. Therefore, the default value would be taken here: an empty list.
We now modify our two existing pipelines so that they inherit from this template and set the values for the parameters. To do this, we first need to specify the Git repository that contains the template and give it an alias. After that, we can specify the template with extends: and template:. The syntax here is <relative path>@<repository-alias>. When a pipeline contains extends: at the top level, it must not contain its own stages:, jobs:, or steps: alongside it; instead, the entire pipeline must be built on the basic structure of the template, and all individual changes must be implemented via parameters. As mentioned before, Azure DevOps assembles a single large pipeline script from the template hierarchy before executing the pipeline, so we end up seeing exactly the same result.
Versioning with Git Tags
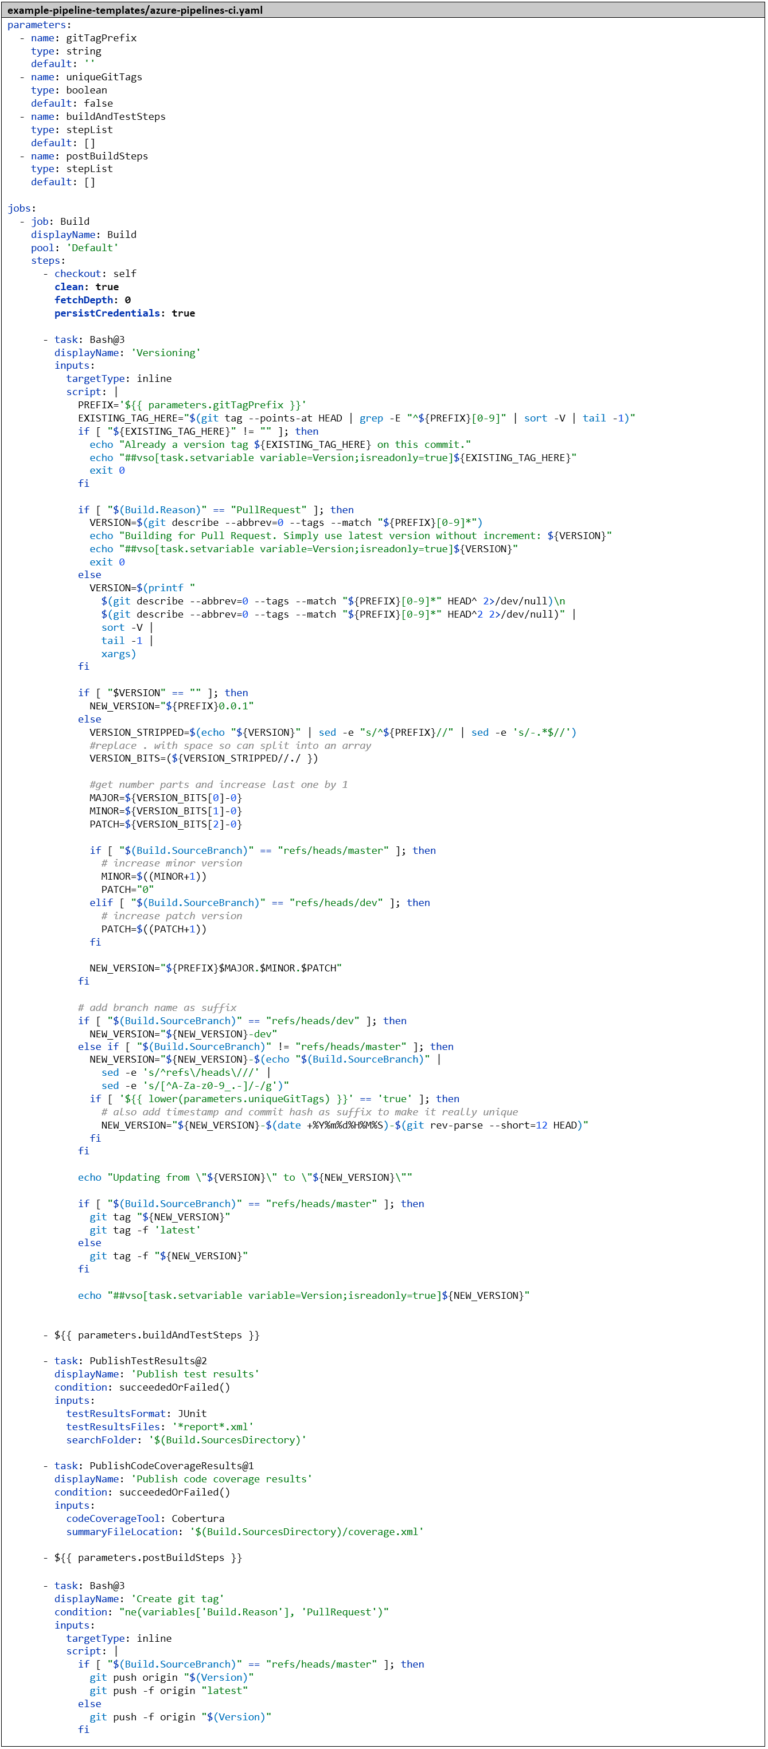
Currently, we are using the Git commit hash as the Docker image tag, which is difficult to remember. A hard-coded tag like latest would have the disadvantage that we could only use one version in parallel. It therefore makes sense to introduce a versioning concept based on Semantic Versioning and integrate it into the pipeline so that the version number is automatically incremented and simultaneously used as the Docker image tag. We also create a Git tag for each build to be able to associate the Docker images with the source code later. Since the logic for this becomes relatively complex, we put it in a Bash script. Most likely, we will need it in future CI pipelines as well, so we immediately create another template azure-pipelines-ci.yaml, which serves as a new base template for azure-pipelines-ci-docker.yaml. This way, we already have a template hierarchy with three levels.
To explain the script – we distinguish different cases:
If there is already a version tag directly on the commit for which the pipeline is running, we take this and don’t change anything about the version.
If the pipeline was started from a pull request, we don’t care about versioning. We just want to find out if the code and Docker image can be built and if the tests are successful. So we simply take the last previous version that we can find in the Git history and don’t change anything about the version.
Otherwise, we search in the Git history for the nearest version tag in the past. If we are on a merge commit, we search in both directions and take the higher version.
If we don’t find any previous version, we start with version 0.1.
Otherwise, we increase the version as follows:
On the master branch, we increase the minor version by 1.
On the dev branch, we increase the patch level by 1.
On feature branches, we don’t increase the version number.
We also append a suffix to the version number:
On the dev branch -dev.
On feature branches, a stripped-down version of the branch name.
For Go projects, it’s important that the tags are not moved, as the Go client caches the entire Git repository locally and stores a signature for each version that must not change anymore. For this use case, there is the parameter uniqueGitTags. If this is set to true, we create a separate unique version for each commit by appending another suffix that contains the commit hash and a timestamp.
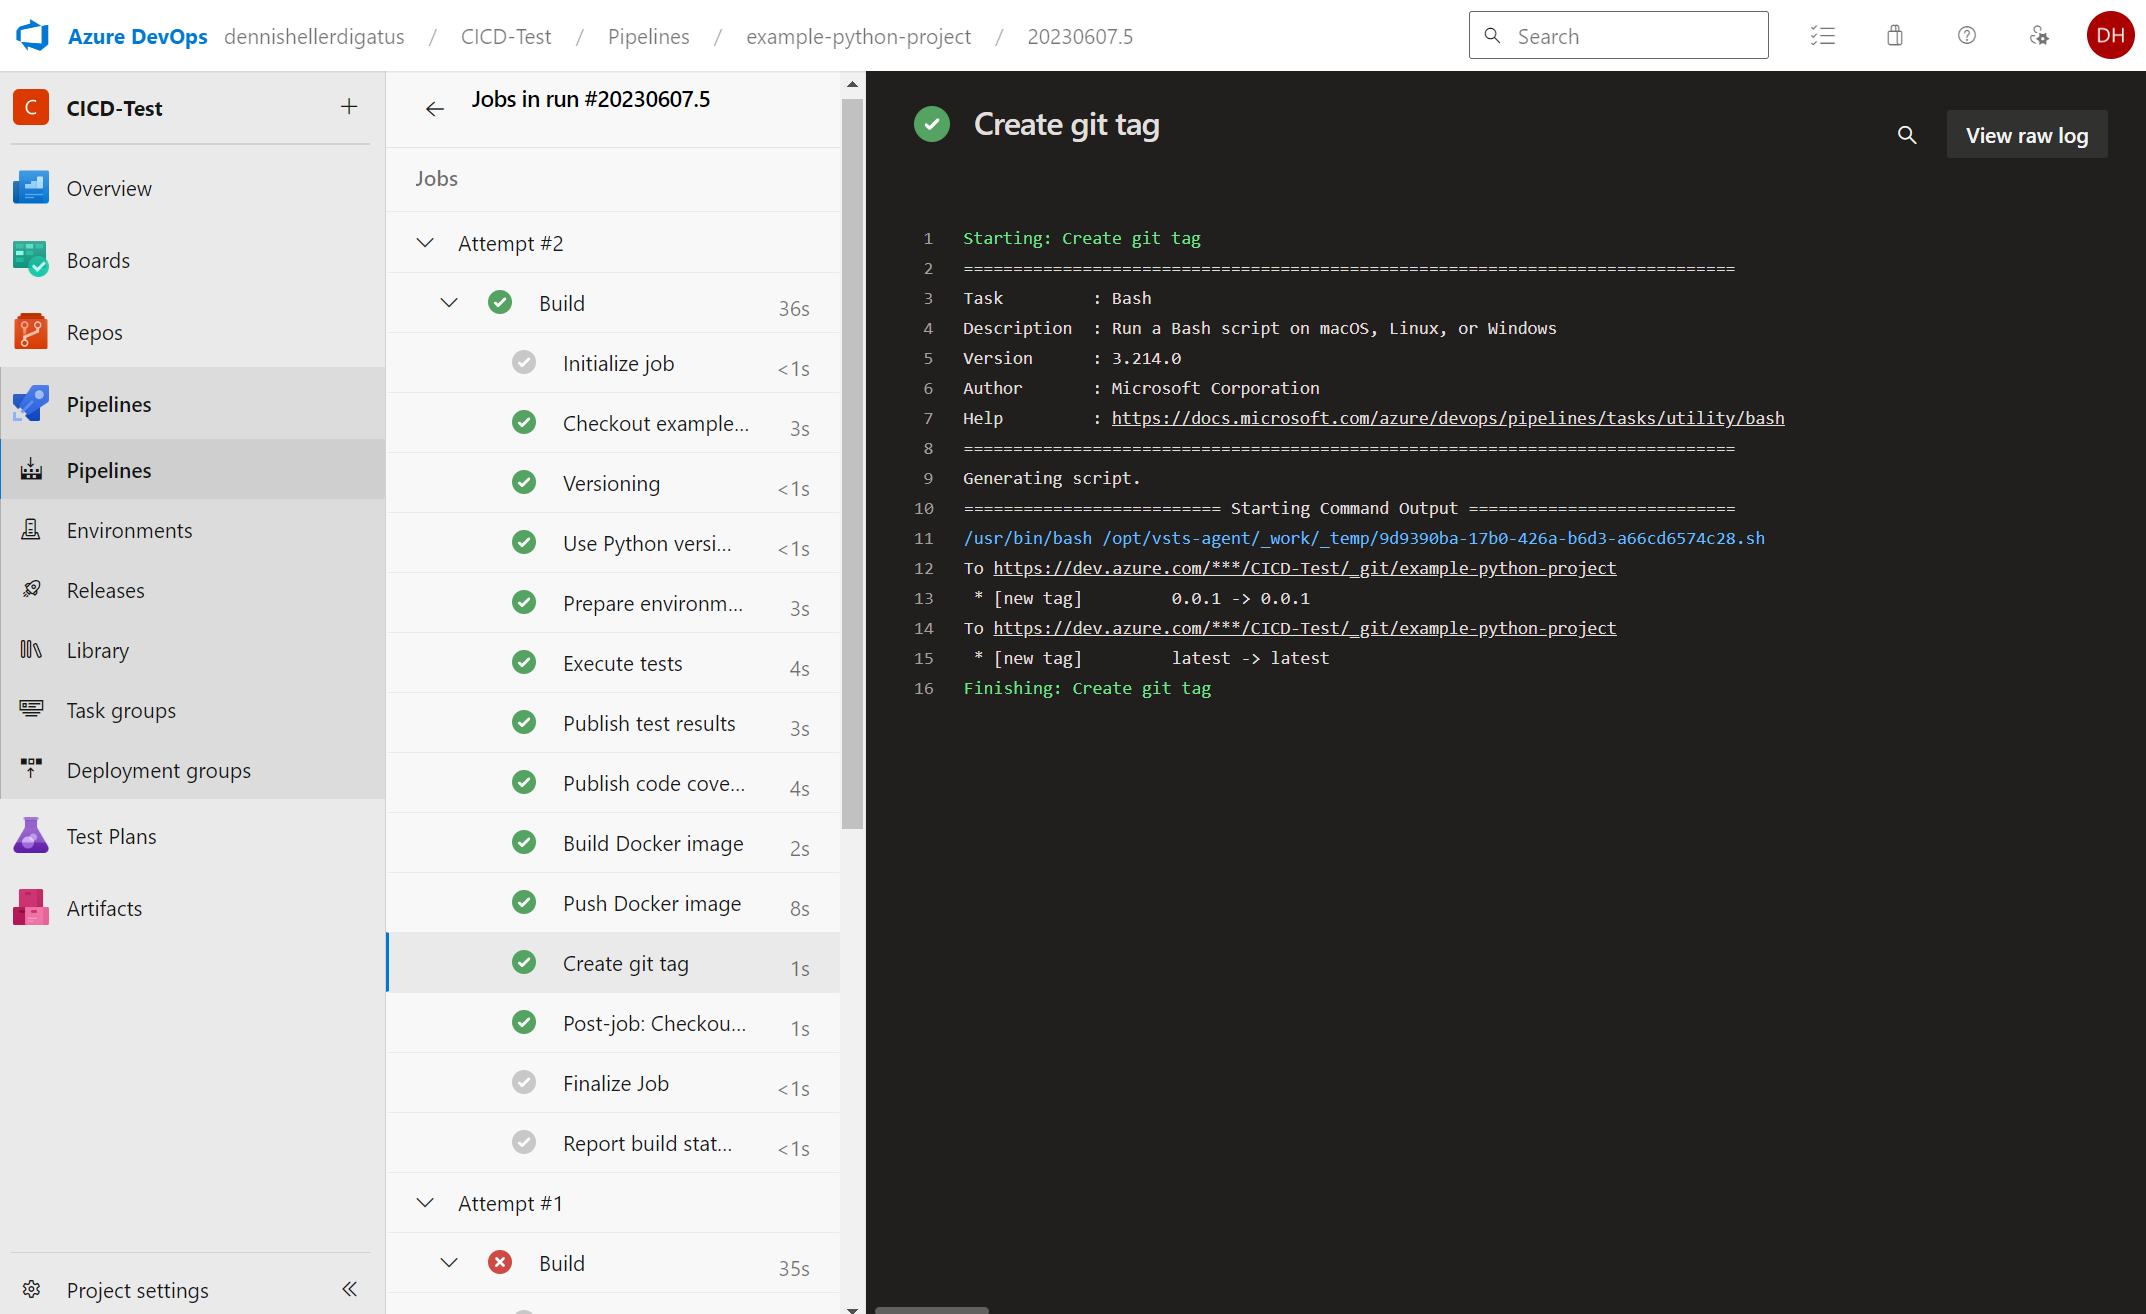
From the Bash script, we create a runtime pipeline variable called Version. This is possible with the help of a so-called Logging Command. To do this, we only need to write a special command to the standard output of the Bash script: echo“##vso[task .setvariable variable=”<name>;isreadonly=true”]<VALUE>”. This way, the version can be used in subsequent pipeline steps, for example as a Docker image tag. We only push the version tag back to the remote Git repository if the pipeline has run successfully; otherwise, it should be ignored. To do this, we force Azure DevOps to completely clean checkout the Git repository every time a pipeline is executed by setting the parameter clean: true in the checkout: step. We also need to set the parameter persistCredentials: true, otherwise the credentials for the remote Git repository would be deleted for security reasons after the checkout: step, and we would have no credentials to push the Git tag back.
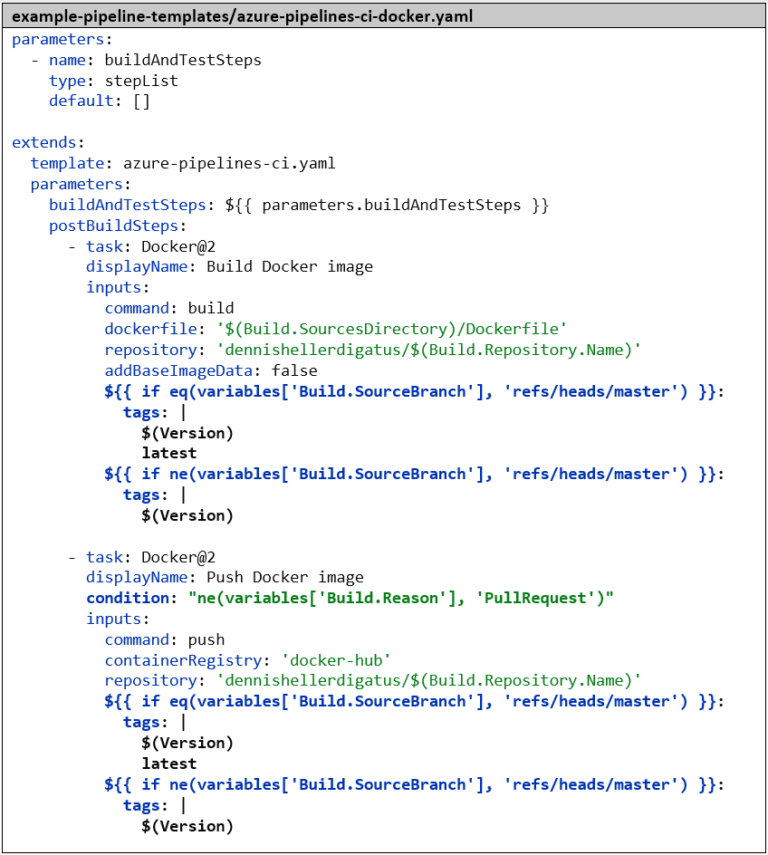
The azure-pipeline-ci-docker.yaml is then reduced to the two Docker steps. For referencing the template, the filename azure-pipeline-ci.yaml is sufficient here, as both files are in the same Git repository. It’s important to note the change of the Docker image tag from ‘$(Build.SourceVersion)’ to ‘$(Version)’, to use the version number as the Docker image tag. If we are on the master branch, we set – as is common with Docker images – the latest tag in addition to the version number. We also add a condition: to the “Push Docker Image”–Step that skips the step in the context of a pull request. As with versioning, in the context of a pull request, we are only interested in checking the validity of the code and not publishing anything.
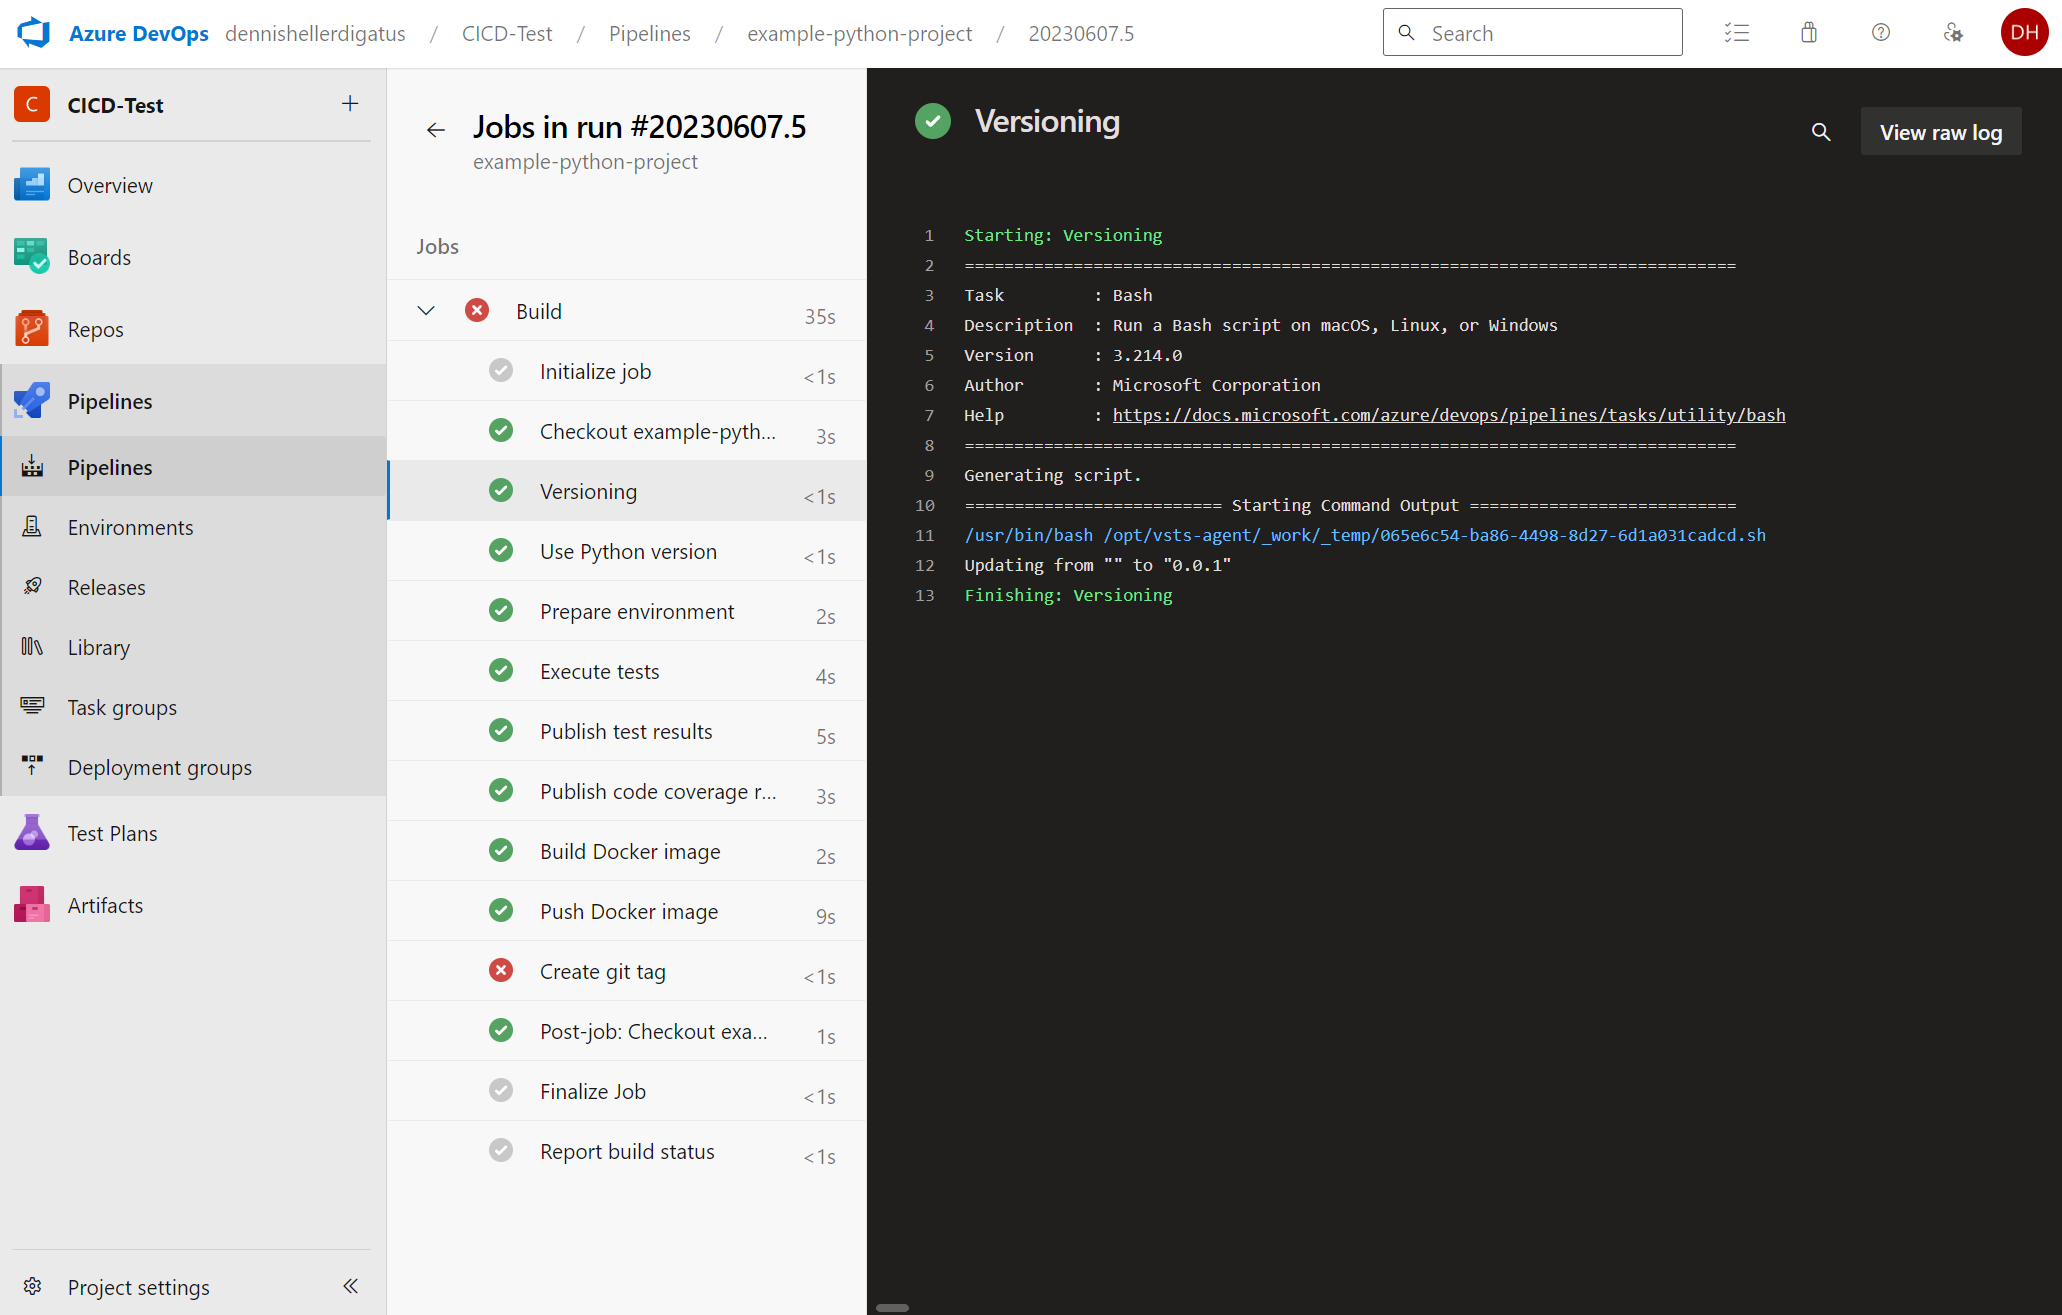
Now we start the pipeline for the example-python-project. At first, not much is visible from the major restructuring behind the scenes. New are the build steps Versioning and Create git tag. Since we don’t have any other version tag yet, we get the following message: Updating from “” to “0.0.1”.
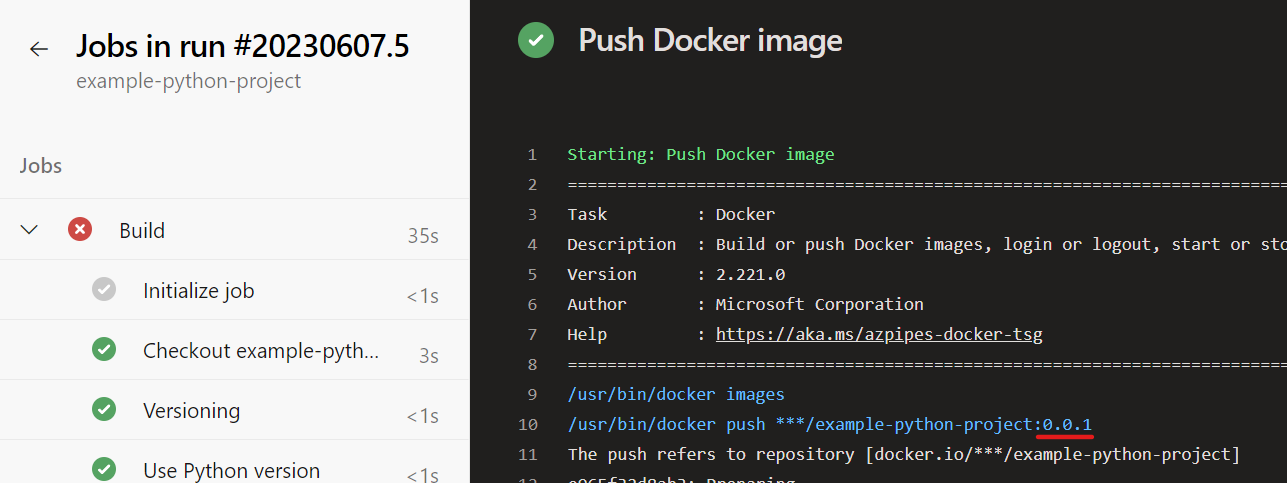
For the Docker push, the version number is now used as the tag as desired:
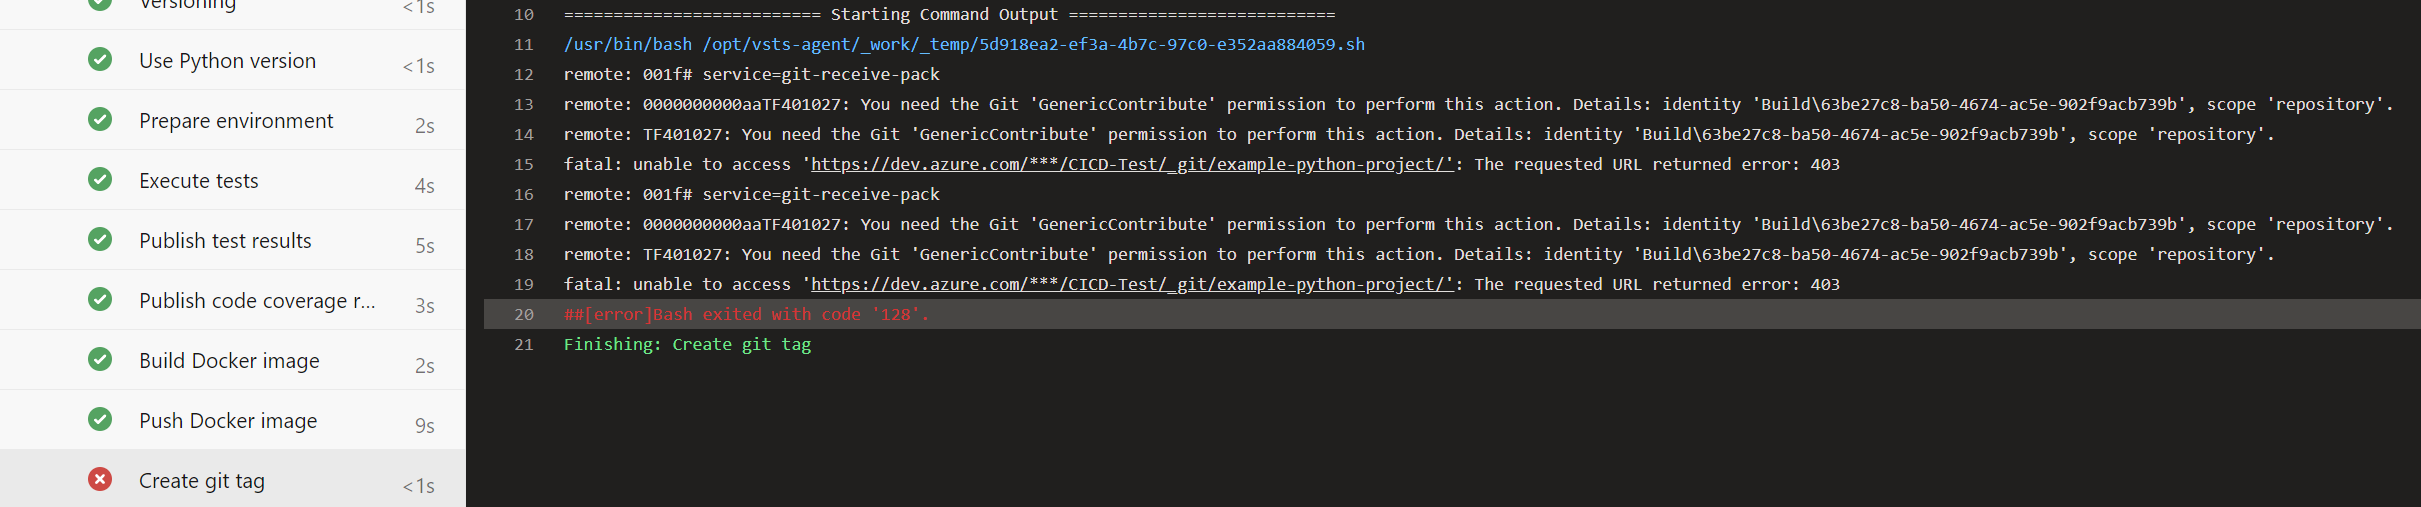
Unfortunately, pushing the Git tag still fails:
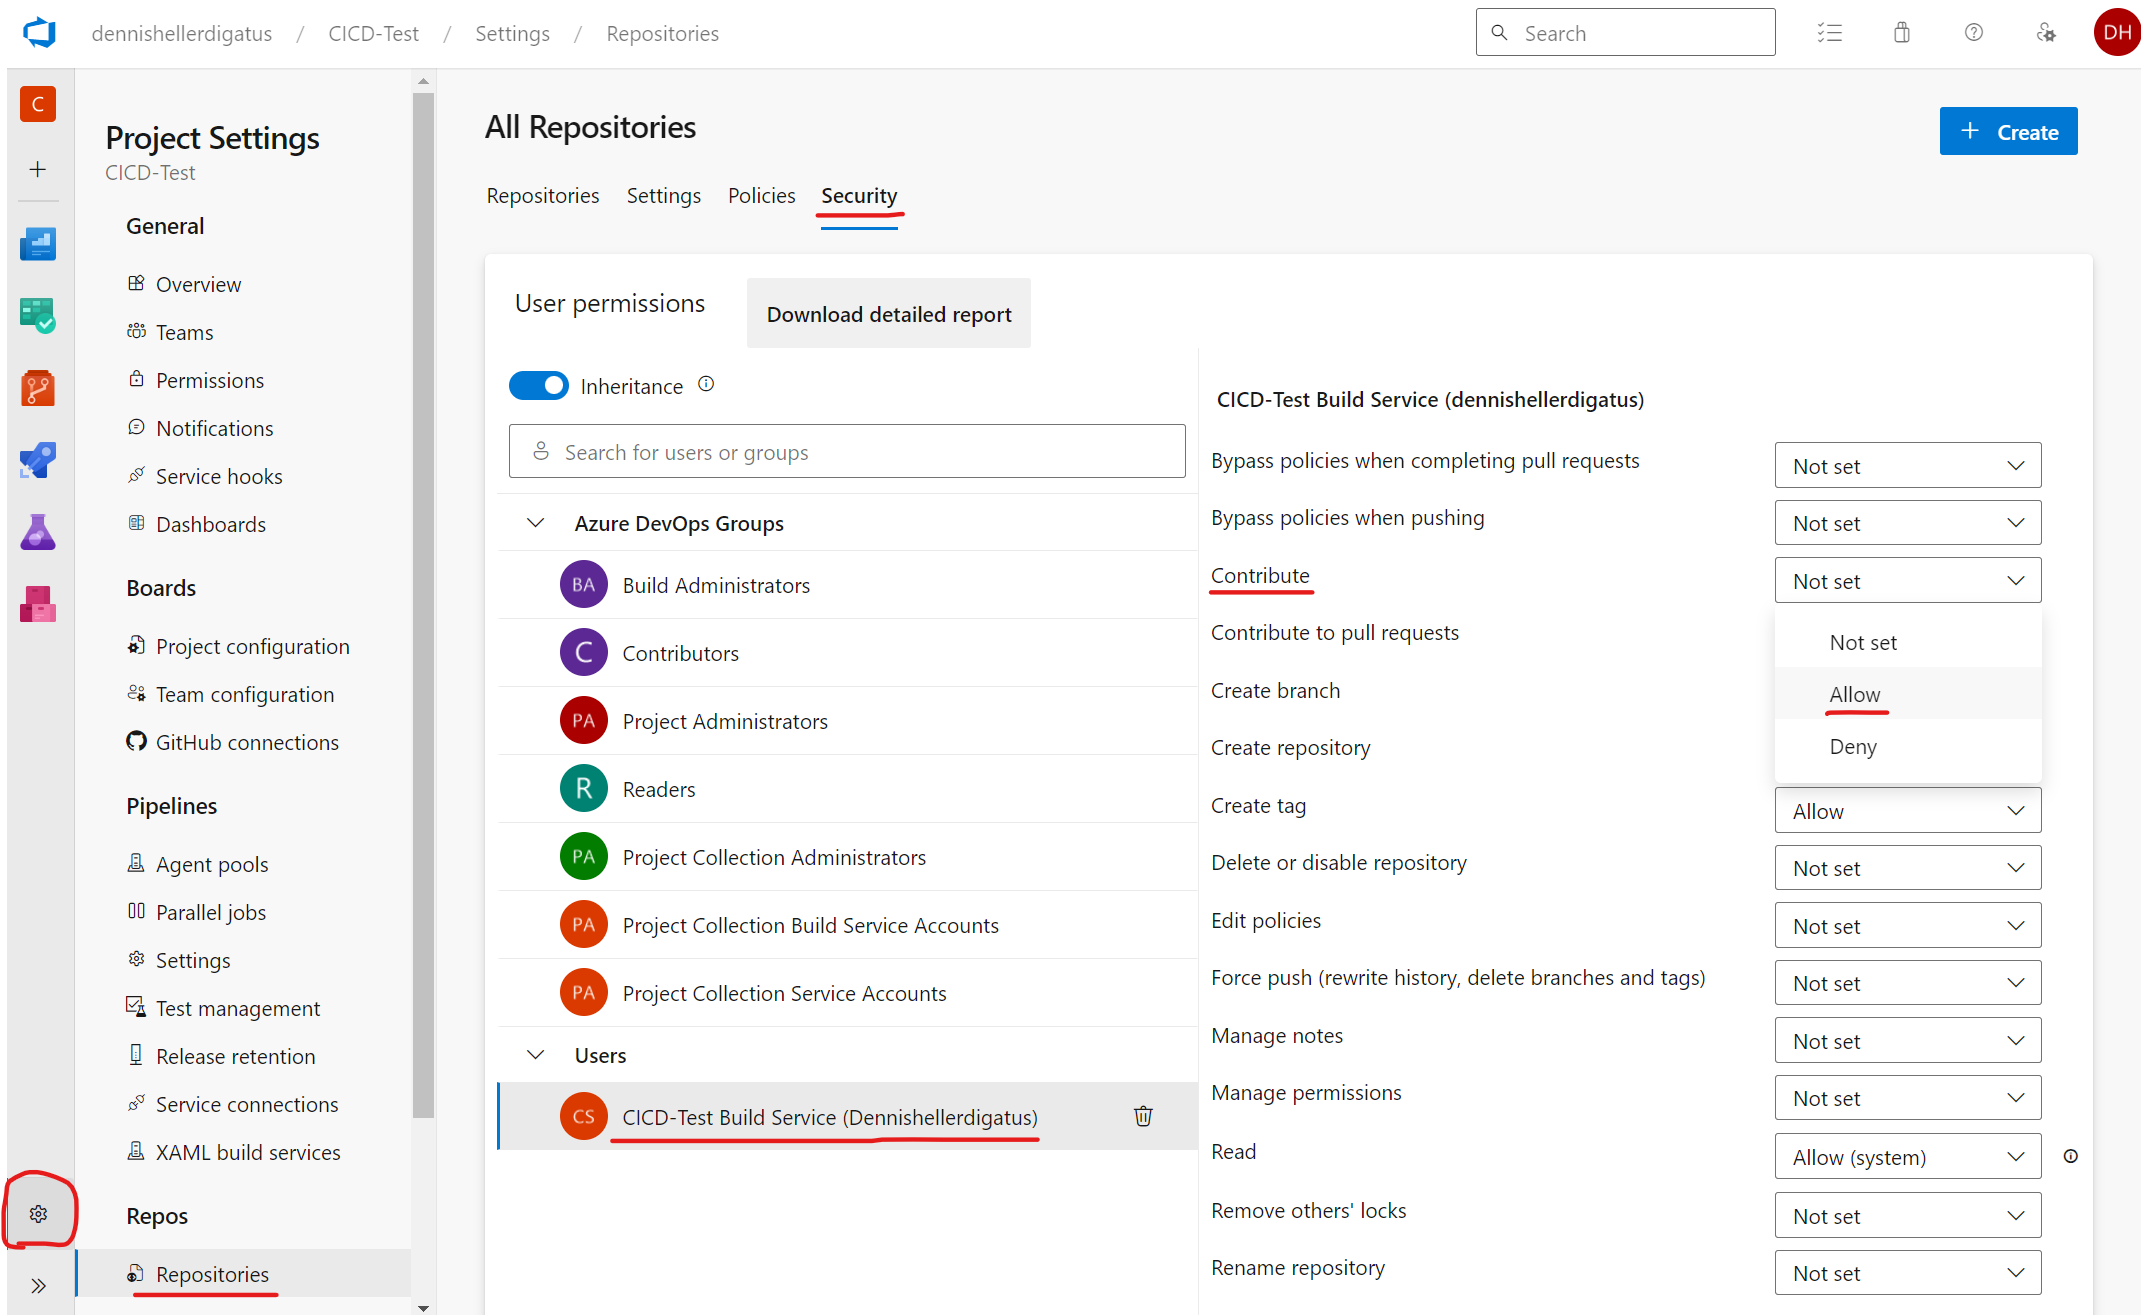
This is because pipelines in Azure DevOps are executed in the name of a virtual user called <Project-Name> Build Service (<Organization-Name>). For security reasons, this user by default does not have write permissions on the Git repositories. In our case, however, this is desired. To grant the necessary permission, we navigate through the menu via the gear icon in the bottom left to “Project Settings” → “Repositories” → “Security” tab → “Users” → “CICD-Test Build Service (dennishellerdigatus)” and change the value for Contribute in the table on the right from Not Set to Allow:
Clicking on Rerun failed jobs in the failed pipeline shows us that we have found the right setting in the permissions jungle of Azure DevOps. The pipeline now runs successfully:
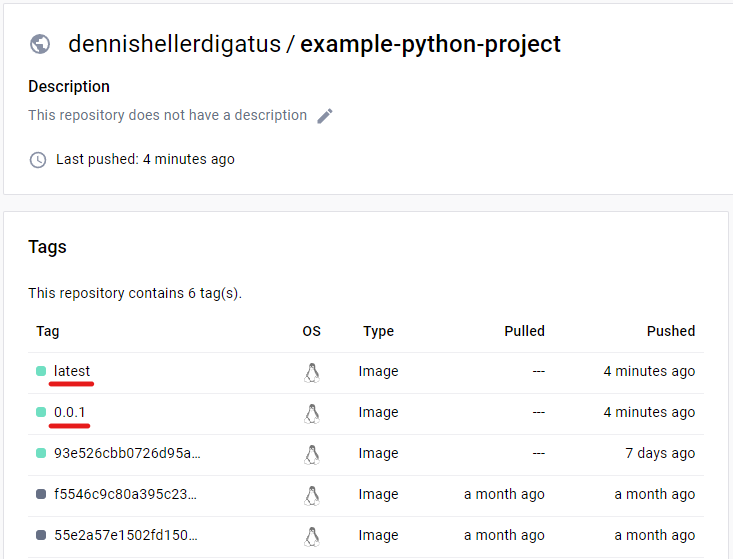
We also see the new tags in the Git log and in Docker Hub:
Conclusion
Azure DevOps offers a variety of options for creating both simple and complex pipelines. It’s nice that – unlike other CI/CD systems – you can quickly and easily create pipelines without having to think about many issues. This is because the default values and settings are very well balanced between the necessary freedom and security. The more complex features are encapsulated in such a way that they don’t interfere when you don’t need them. Later, you can break out of these frameworks piece by piece, which means you have to write more code yourself and change settings, but you also have more features available. This way, complex scenarios can also be implemented with template hierarchies and Bash scripts.
The reusability and extensibility of pipeline scripts through the template function – especially the insertion of entire step lists – is definitely one of the great strengths of Azure DevOps. And if the standard tasks are not sufficient, there is always the option to switch to the more comprehensive Bash level. All necessary tools are also installed there, such as git, go, and python. If we use a self-hosted build agent, we could install any additional tools like jq, make, or kustomize. Fortunately, we have hardly had to worry about permissions so far. There are also many configuration options here, but unfortunately, the effect of permissions is sometimes very difficult to understand. A plus point here, however, is that Azure DevOps offers a ‘Quick-Fix’ button for frequently occurring permission problems, which automatically adjusts the permissions on the spot without having to navigate through complex menus.
Latest Posts
Digitalization, IT M&A
IT and OT Integration in Acquisition Processes
IT Carve-Out, IT M&A
Successful IT Carve-out at Trench: from Corporate Structure to Mid-sized Market Leader
IT Infrastructure
Successful transition of the IT landscape of Thüga Aktiengesellschaft and takeover of IT support